


Installing an acrylic tub is not that difficult and any home-based DIYer can get it done with proper guidelines. If you are eager to save money by doing it yourself, we show you every step of the way.
You may have found the best acrylic bathtub after a lot of market research or by going through tub reviews done by reliable reviewers like ToiletsGuide that houses a dynamic team of plumbing engineers, market analysts, and interior designers.
No matter what, the high quality won’t do any good if you cannot do the installation the right way. Follow our guide and you will surely be surprised with the result when done!
Acrylic Tub Installation – Step by Step
Necessary Tools
- Adjustable Wrench
- 4-in-1 Screwdriver
- Circular Saw
- Caulk Gun
- Drill Bit Set
- Cordless Drill
- Hammer
- Grout Float
- Hole Saw Kit
- Hearing Protection
- Notched Trowel
- Level
- Pry Bar
- Pipe Wrench
- Slip Joint Pillars
- Safety Glasses
- Utility Knife
- Tape Measure
Necessary Materials
- 1 /4-in. Roofing Nails
- 1-1/2-in. roofing Nails
- Backerboard Screws (Box)
- Adhesive
- Grout
- Caulk
- Painting Supplies
- New Tub and Surround
- Title
- Plumbing Supplies (As Required)
- Two 2x4x8
- Shower/Tub Faucet
Installing the Tub
Planning

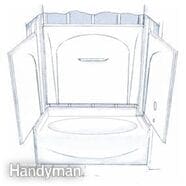
An acrylic tub is easy to clean and after cleaning looks spotless. It doesn’t have many joints and it is easy to install. Mostly, it has a tub and three shower wall panels. All of these are seal and interlock.
Here, we will discuss the installation process of an acrylic tub. This process can be a little complex for beginners. You need some experience of working with general carpentry and plumbing tools.
First, measure your bathtub’s approximate length and width. Allow around 3/4 in. extra at every wall and the measurement needs to be close to a standard tub size. Most are 30 in. wide and 5 ft. long are planned to fit against the wall studs. (Figure1)
Now shop for surrounds and tubs at bath and kitchen specialty stores or home centers and order the tub. Acrylic tubs are light and a person can easily lift them. But one-piece shower/tub stalls and one-piece bathtub shower surrounds are generally too heavy to lift into a bathroom.
Then take a new overflow assembly and drain, clear silicon bath/kitchen caulk, and other necessary materials. You can also replace your old shower spout, shower arm, and valve now.
Removing the Shower Head and Tub Faucet

Spread a drop cloth, preferably, made of thick canvas, over your bathroom floor and adjacent fixtures. Find the stoppages for the tub and turn the water off. Then turn on the tub faucet to ensure the stoppages are working. If water keeps dropping out, stop the main supply of water, and replace the stoppages.
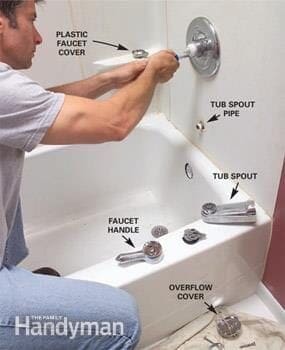
Remove the faucet hardware (Image1). Search for an Allen screw in a recess under your tub spout. If you can’t find one, you probably need to unscrew it counterclockwise with the pipe wrench. If you want to reuse or save the spout, wrap a rag around the jaws. Then also unscrew your shower arm with your pipe wrench.
Removing the Previous Bathtub Surround

Check the new tub surround’s dimensions before cutting out the tile wall or old surround. Then make the cuts around 1 in. larger than the new tub’s rough-in dimensions (Image 2). Cut through the tub’s surrounding drywall and trim down to the base.
Disconnect or cover the tub drain so that the waste line doesn’t fill up with waste. You need some strength to perform this cutting process but avoid cutting into hidden pipes, and wires, and insulation. When using a keyhole or drywall saw, keep your cut shallow and cut carefully.
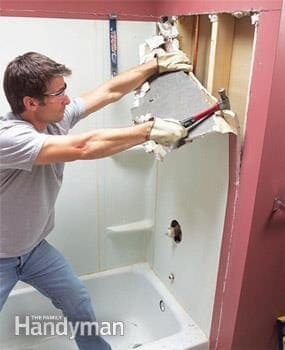
If your old tub surround is glued to drywall, (Image:3) pull out the drywall and surround it with the hammer, your hands, and pry bars, beginning at the top and then working down.
Removing the Previous Bathtub

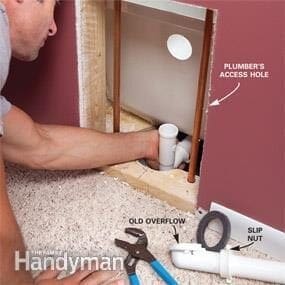
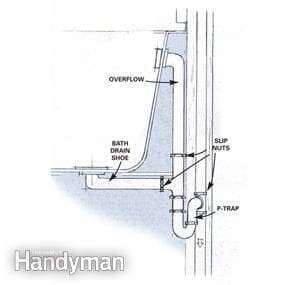
Remove the plumbing access in the attached room for disconnecting your drain lines. Unscrew your tub drain and overflow it to the joining point of the P-trap [Image 4 and 4(B)]. When the old overflow and waste connections get stuck, cut them with a hacksaw, or reciprocating saw and later unscrew the stubs when the tub is out. Bring new plastic traps and replace these with your old metal ones. You can also replace your shower valve now.
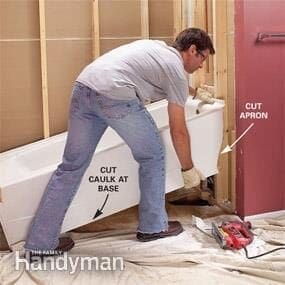
Use a jigsaw from Tool Inspector to cut out a chunk and then lift out the tub (Image 5). If your old tub is iron-made, remove the drywall sliding them out. For a cast iron tub, break it up using a sledge.
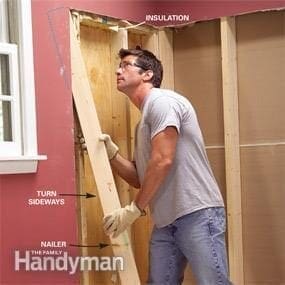
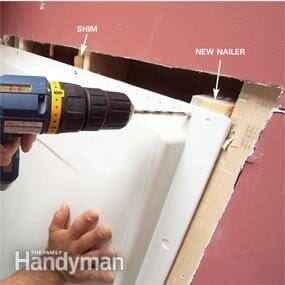
Install new 2×4 nailers as required to support drywall edges and the tile backer that you will add later. (Image 6)
The Way to Replace a Bathtub

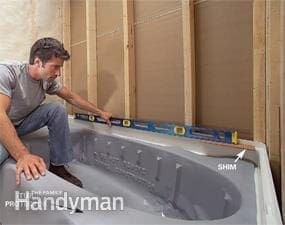
Set your new tub into place and check that for level. Figure the required shim size to level it and then remove the tub tack the shims at leg positions of the tub.
Now, note the way the outer edge of the tub meets the floor. It’s the time you can plan this joint, when you may still remove your tub. You should look carefully at whether the new tub meets the floor exactly like the old one. If not, for larger gaps, you may need to trim back the flooring to get your tub to fit. Different solutions are available for different floor types and gap sizes.
Install a new drain shoe before installing your tub. Under the rim lay a clear silicone caulk’s thick ring and follow the manufacturer’s instructions and screw it together.
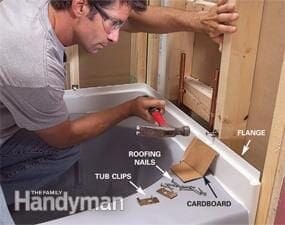
Now install your bathtub anchoring it to the wall studs as instructed by the manufacturer (Image 8)
The Way to Install the Surround
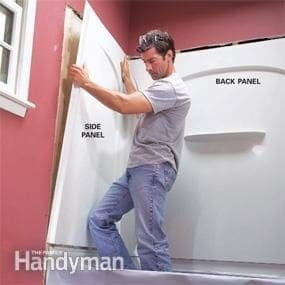
Set the surround’s back part on the tub rim, temporarily carrying it in place using a nail above the top flange. Now set the side panels. (Image 9)
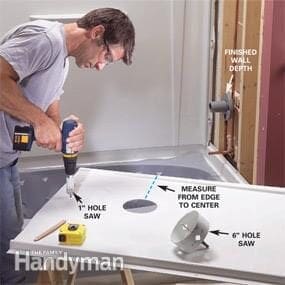
Center and then install the copper lines and new shower valve. Now measure the tub spout as well as the valve’s exact centers and lay them on the end panel. Then drill the holes of the end panel.
Interlock the panels with the tub, keep adjusting them until the tops look even. Now, predrill and fasten the flanges at every stud. If there is a gap, add shims keeping the flange straight. (Image 11)
Finishing the Walls Surrounding the Tub
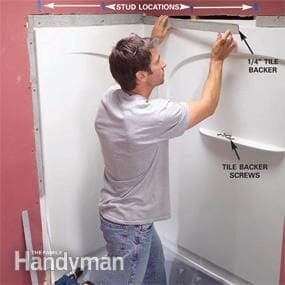
Cover the gap and flange with 1/4 or 3/8-in. tile backer. If holes are oversized, predrill and move tile backer screws so that those don’t break the thin backer board. (Image 12)
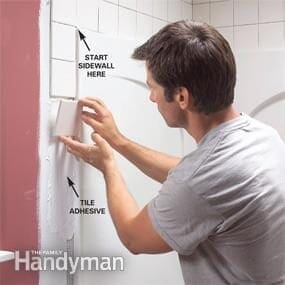
First, tile the back wall, keeping the layout in the center. Now beginning from the end walls’ outer corner tile toward the back wall, then down to the floor. Apply grout when the adhesive is set. {Image 13 (A)}
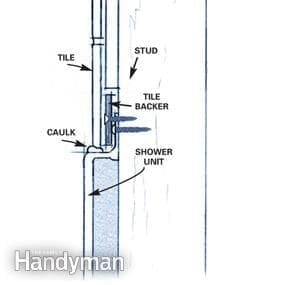
Carefully fill in above the surround so that the transition to the wallboard is smooth.
Installing the Completed Plumbing
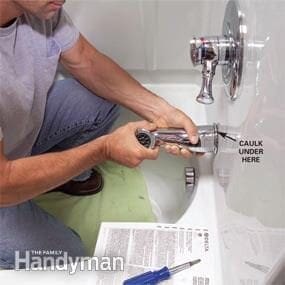
Attach the valve handle and cover plate. Install caulk and snug the spout into place. (Image:14)
Now complete the plumbing task. Spread a silicone bead around each hole’s edge in the surrounding. Now install the tub spout and faucet plate.